Starting seeds indoors gives you a head start on the growing season that transforms your garden’s productivity. While neighbors wait for garden centers to stock transplants in May, indoor seed starters have robust, hardened-off seedlings ready to plant the moment conditions allow. The result is weeks of additional growing time, access to hundreds of varieties never sold as transplants, and the deep satisfaction of growing your food from the very beginning of its life.
The economic case is compelling too. A single packet of tomato seeds (containing 25 to 50 seeds) costs about the same as one nursery transplant. Start 10 plants from that packet and you have saved significantly while getting access to specific varieties matched to your garden conditions rather than the generic selections garden centers offer. Multiply this across peppers, herbs, flowers, and every other crop you start, and seed starting pays for its modest equipment investment many times over.
This guide covers the complete process from calculating timing and assembling equipment to sowing, growing strong seedlings, and transitioning them to the outdoors. Whether you are starting a few tomato plants on a windowsill or running a full seed-starting operation with lights and heat mats, these techniques produce healthy transplants that thrive in the garden.
Key Takeaways
- Timing is everything — count backward from your last frost date using the weeks-before-transplanting listed on seed packets to determine exactly when to start each crop
- A simple grow light ($25 to $60) positioned 2 to 4 inches above seedlings produces stocky, strong transplants; windowsills alone produce leggy, weak ones
- Bottom heat (seedling heat mat) dramatically improves germination speed and uniformity for warm-season crops like tomatoes, peppers, and squash
- Hardening off — gradually acclimating seedlings to outdoor conditions over 7 to 10 days — is the most commonly skipped step and the most common cause of transplant failure
- Starting seeds indoors saves money, provides access to superior varieties, and gives your garden a multi-week head start on the season
When to Start Seeds Indoors
The Countdown Method
Every seed starting schedule begins with one date: your last expected spring frost. This date varies widely by location — check with your local extension service or use online tools to find yours. From this anchor date, count backward the number of weeks each crop needs indoors before transplanting.
8 to 10 weeks before last frost: Peppers (both sweet and hot), eggplant, and celery. These slow starters need the longest indoor growing time. Start peppers early — our pepper growing guide details why timing matters so much for this crop.
6 to 8 weeks before last frost: Tomatoes, basil, and most annual flowers (marigolds, zinnias, cosmos, petunias). Tomatoes are the most popular seed-started crop and one of the most rewarding — access to heirloom and specialty varieties unavailable as transplants is reason enough to start from seed.
4 to 6 weeks before last frost: Brassicas (broccoli, cabbage, cauliflower, kale), lettuce, and onions for transplant. These cool-season crops can be transplanted outdoors before the last frost, so they need less indoor time.
2 to 3 weeks before last frost: Cucumbers, squash, melons, and pumpkins. These fast-growing, frost-sensitive crops are started indoors only for a short head start. They dislike root disturbance, so start them in peat pots or soil blocks that go directly into the ground.
The Biggest Timing Mistake
Starting too early is a more common and more damaging mistake than starting too late. Seedlings started too early outgrow their containers before outdoor conditions are ready, become root-bound, leggy, and stressed. A 12-week-old tomato seedling crammed in a 3-inch pot with a tangled root mass underperforms a stocky 6-week-old plant with a healthy, actively growing root system. Follow the recommended timing even if the February itch to garden strikes early.
Equipment and Setup
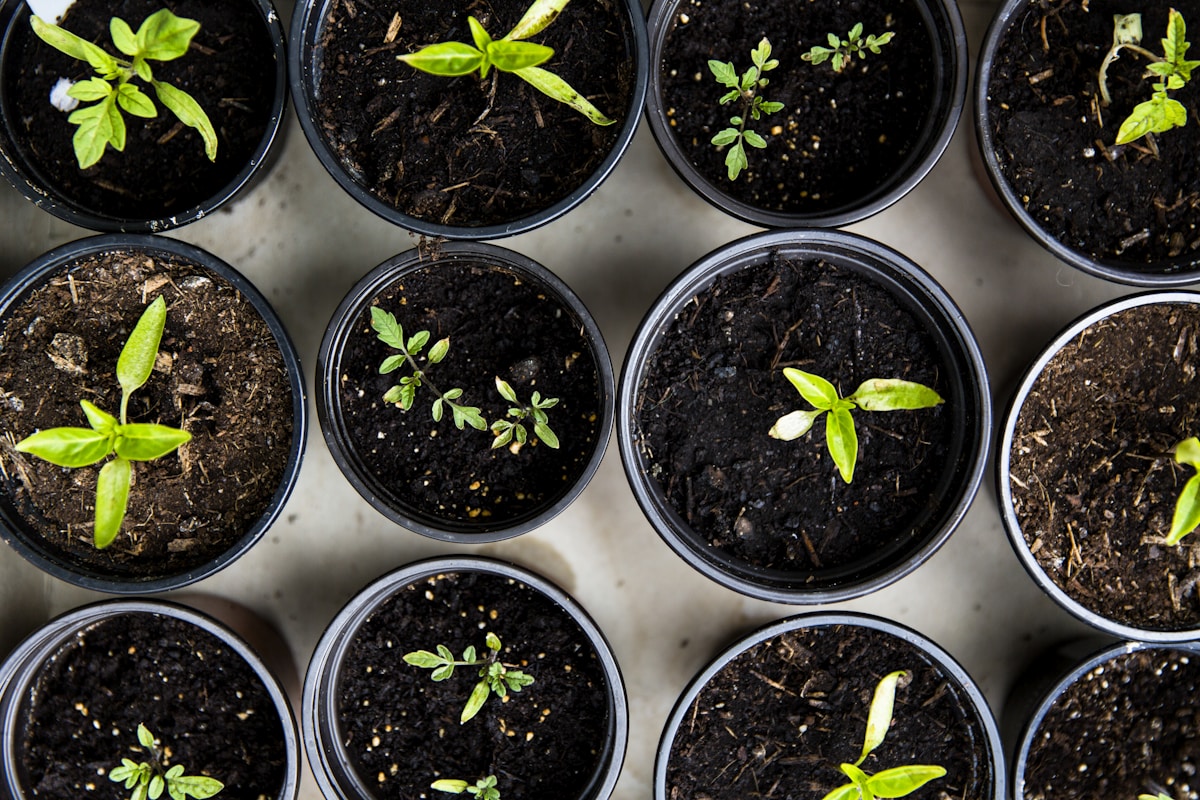
Containers
Seed starting containers need only three qualities: they hold soil, they drain, and they are the right size. Standard seed starting options include cell trays (multi-cell plastic inserts, commonly 6-cell, 36-cell, or 72-cell), individual small pots (3 to 4-inch), peat pots (biodegradable, planted directly into soil), soil blocks (compressed blocks of seed starting mix made with a blocking tool), and recycled containers (yogurt cups, egg cartons with drainage holes punched).
Start seeds in small cells or containers (72-cell trays or 2-inch pots) and pot up to larger containers (3 to 4-inch pots) once seedlings develop their first true leaves. This two-stage approach uses space efficiently and encourages compact root development.
Seed Starting Mix
Seed starting mix is lighter and finer than regular potting soil. It typically contains peat moss or coconut coir, vermiculite, and perlite with minimal or no added fertilizer. This fine, sterile medium provides ideal conditions for tiny seeds and delicate new roots. Do not use regular potting mix or garden soil for starting seeds — they are too dense, drain poorly at this scale, and may harbor damping-off fungi that kill seedlings.
Pre-moisten seed starting mix before filling containers. Add warm water gradually, mixing by hand until the medium is evenly damp (like a wrung-out sponge) throughout. Filling containers with dry mix and watering from above creates uneven moisture and can float seeds out of position.
Lighting
Adequate light is the single most important factor in growing strong seedlings. Natural windowsill light, even from a bright south-facing window, is insufficient for most seedlings — it is both too dim (intensity drops dramatically just feet from the glass) and too directional (seedlings stretch toward the light source, becoming leggy and weak).
A basic LED shop light or purpose-built grow light positioned 2 to 4 inches above seedling tops provides the high-intensity, even illumination that produces stocky, compact transplants. Run lights 14 to 16 hours per day on a timer. Raise the light as seedlings grow, maintaining the 2 to 4-inch distance. The investment (typically $25 to $60 for a light adequate for a standard seed tray) pays for itself immediately through healthier seedlings and is reusable year after year.
Bottom Heat
A seedling heat mat is the most underrated seed starting investment. It maintains soil temperature at 70 to 80 degrees Fahrenheit — the optimal range for warm-season crops — regardless of room temperature. Pepper seeds that take 14 to 21 days to germinate at room temperature sprout in 7 to 10 days with bottom heat. Tomatoes, eggplant, basil, and flowers also benefit significantly.
Remove the heat mat once seedlings emerge — continued bottom heat after germination can cause leggy growth. Cool-season crops (broccoli, lettuce, onions) do not need heat mats and germinate well at normal room temperatures.
Sowing Seeds
Depth and Spacing
The general rule: plant seeds at a depth of two to three times their diameter. Tiny seeds (lettuce, basil, many flowers) are pressed onto the surface and barely covered. Medium seeds (tomatoes, peppers) go a quarter to half inch deep. Large seeds (squash, beans) go three-quarters to one inch deep.
Plant 2 to 3 seeds per cell and thin to the strongest seedling after germination. This insures against poor germination rates. Snip weaker seedlings at soil level rather than pulling them, which disturbs roots of the keeper.
Moisture and Covering
After sowing, mist the surface gently to settle soil. Cover trays with clear plastic humidity domes or wrap to maintain moisture during germination. Seeds need consistent moisture to germinate — the medium should never dry out during this period. Check daily, misting if the surface appears dry.
Remove the humidity cover as soon as the first seedlings emerge. Keeping it on after emergence promotes damping-off disease and reduces air circulation. Most seed trays have a removable dome that lifts easily for this purpose.
Growing Strong Seedlings
Light Management
As soon as seedlings emerge, they need maximum light. Position grow lights 2 to 4 inches above the seedling tops and run for 14 to 16 hours daily. Seedlings stretching toward the light (becoming tall and thin with long spaces between leaves) are not getting enough light — lower the fixture or increase duration.
Watering Seedlings
Water seedlings from the bottom whenever possible. Set containers in a tray of water and allow the soil to wick moisture upward. This keeps the soil surface drier (reducing damping-off risk) while ensuring roots stay evenly moist. Remove containers from the water tray once the surface glistens with moisture. If top-watering, use a gentle stream that does not flatten seedlings.
The goal is consistently moist but never waterlogged soil. Allow the surface to dry slightly between waterings — seedlings in perpetually soggy medium develop root rot and damping-off disease. Good drainage and air circulation are your allies.
Potting Up
When seedlings develop their first set of true leaves (the second pair of leaves, which look like miniature versions of adult leaves), transplant them into individual 3 to 4-inch pots filled with standard potting mix. This gives roots room to develop and provides nutrients that seed starting mix lacks.
Handle seedlings by their leaves, never the stem — a damaged leaf regrows, but a crushed stem kills the plant. Bury the stem slightly deeper than it was growing (especially for tomatoes, which develop roots along buried stems) and water thoroughly after transplanting. Provide a day of slightly reduced light to recover from the transplant stress.
Fertilizing
Seed starting mix contains minimal nutrients, so seedlings need supplemental feeding once true leaves appear. Apply half-strength liquid fertilizer (organic fish emulsion or balanced synthetic) every 7 to 10 days. Full-strength fertilizer burns tender young roots — always dilute more than you think necessary. Potting mix used at the potting-up stage contains more nutrients, so you can reduce feeding to every 2 weeks after transplanting to larger pots.
Building Strength: Air Movement
A small fan running on low speed near seedlings for a few hours daily produces remarkably sturdier stems. The gentle stress of air movement stimulates thicker, stronger stem development — the same principle behind outdoor plants being stronger than indoor ones. Wind-stressed seedlings also transition to outdoor conditions more smoothly because their stems are pre-conditioned for physical stress.
Hardening Off: The Critical Transition
Hardening off is the gradual process of acclimating seedlings to outdoor conditions — direct sun, wind, temperature fluctuations, and lower humidity — before permanent transplanting. Skipping or rushing this step is the most common cause of transplant failure and stunting. Indoor-grown seedlings placed directly into full outdoor conditions suffer sunburn, wind damage, and temperature shock that can set them back weeks or kill them.
The 7 to 10-Day Process
Days 1 to 2: Place seedlings outdoors in a sheltered, shaded location protected from wind for 2 to 3 hours. Bring inside overnight.
Days 3 to 4: Increase outdoor time to 4 to 5 hours with brief exposure to filtered sunlight. Continue bringing inside overnight.
Days 5 to 6: Extend to 6 to 8 hours with increasing direct sun exposure. Begin leaving seedlings out in a protected spot overnight if temperatures stay above 50 degrees Fahrenheit.
Days 7 to 10: Full-day outdoor exposure including direct sun. Leave out overnight unless frost threatens. By day 10, seedlings should handle full outdoor conditions without wilting or burning.
During hardening off, reduce watering slightly so seedlings are not consistently soggy — this encourages root development in anticipation of garden conditions. Seedlings that wilt severely during any stage should be brought back to gentler conditions and the process extended by a few days.
Transplanting to the Garden
Timing the Move
Transplant cool-season crops (broccoli, cabbage, lettuce, onions) 2 to 4 weeks before the last frost date — they tolerate light frost. Transplant warm-season crops (tomatoes, peppers, squash, basil) after all frost danger has passed and soil has warmed appropriately (at least 60 degrees for most, 65 degrees for peppers). Check our pepper guide and other crop-specific guides for exact temperature thresholds.
Transplanting Technique
Transplant on a cloudy day or in late afternoon to reduce sun stress. Water seedlings thoroughly an hour before transplanting — moist root balls hold together better and recover faster. Dig a hole slightly larger than the root ball, set the plant at the appropriate depth (same level for most crops, deeper for tomatoes), firm soil gently around the roots, and water deeply.
Apply 2 to 3 inches of mulch around transplants (not touching stems) to conserve moisture and moderate soil temperature. If hot, sunny weather immediately follows transplanting, provide temporary shade with a shade cloth or inverted pot for 2 to 3 days while roots establish.
Troubleshooting Common Seed Starting Problems
Leggy seedlings: The most common problem, caused by insufficient light. Lower the grow light to 2 inches above seedlings, increase duration to 16 hours, or both. Leggy seedlings can sometimes be salvaged by burying the stem deeper when potting up (works for tomatoes, somewhat for peppers, not for most other crops).
Damping off: Seedlings suddenly collapse at soil level, the stem appearing pinched and water-soaked. This fungal disease thrives in overly moist, poorly ventilated conditions. Prevention: use sterile seed starting mix, avoid overwatering, remove humidity domes after germination, provide air circulation, and thin seedlings to reduce crowding.
Seeds not germinating: Check soil temperature (use a soil thermometer) — too cold is the most common cause. Ensure seeds are not planted too deeply. Verify seed viability (most vegetable seeds remain viable 2 to 5 years when stored cool and dry). Some seeds require light to germinate — check seed packet instructions.
Purple or reddish leaves: Often a phosphorus uptake issue caused by cold soil temperatures. Move to warmer conditions or wait for natural warming — the color usually corrects itself as conditions improve. If it persists, apply dilute liquid fertilizer with phosphorus.
Frequently Asked Questions
Can I start seeds on a windowsill without grow lights?
You can, but results are consistently inferior. Even a bright south-facing window provides a fraction of the light intensity that a $25 LED shop light delivers. Windowsill seedlings are almost always leggier, weaker, and less productive after transplanting. If budget allows even a basic light, use one. The difference in seedling quality is dramatic.
What seeds should NOT be started indoors?
Root crops (carrots, beets, turnips, radishes) do not transplant well — direct sow them outdoors. Beans, peas, and corn germinate and grow so rapidly outdoors that indoor starting provides no meaningful advantage. Squash and cucumbers can be started indoors but resent root disturbance — use peat pots and keep the indoor period short (2 to 3 weeks).
How much does a basic seed starting setup cost?
A functional setup costs $40 to $80: LED shop light ($25 to $40), seed starting trays with cells ($5 to $10), seed starting mix ($5 to $10), and a seedling heat mat ($15 to $25, optional but highly recommended). Seeds add $15 to $30 depending on how many varieties you start. This investment produces transplants worth $200 or more at retail nursery prices and is reusable for years.
My seedlings grew well but died after transplanting. What happened?
Almost certainly inadequate hardening off. Seedlings accustomed to constant indoor temperatures, still air, and filtered light cannot survive the sudden shock of direct sun, wind, and temperature swings without gradual acclimation. Follow the 7 to 10-day hardening off protocol faithfully — it is the most important step between indoor growing and outdoor success.
Is starting seeds worth the effort compared to buying transplants?
Absolutely, especially for three categories: crops where variety selection matters (tomatoes, peppers — hundreds of varieties as seed versus a handful as transplants), crops you need in quantity (a flat of 36 broccoli transplants from seed costs $3 versus $70 at retail), and unique or heirloom varieties simply unavailable as transplants. The skill is also deeply satisfying and connects you to the full cycle of growing food.