Seeds Indoors è un argomento fondamentale che merita un’analisi approfondita. The honest, no-hype guide for first-timers who want to grow their own food from a tiny seed on a kitchen counter — and actually succeed.
The Short Version
- Starting seeds indoors gives you a 6-8 week head start on the growing season — essential for tomatoes, peppers, and other warm-season crops that need every day they can get.
- You don’t need fancy equipment. A sunny windowsill, some cell trays, seed-starting mix, and a spray bottle will get you started for under $20.
- The two biggest beginner mistakes: starting too early (leggy, weak seedlings) and not providing enough light (same result). Both are totally avoidable.
- This guide includes a full seed-starting schedule, step-by-step instructions, a week-by-week care timeline, and troubleshooting for every common problem.
- One pack of tomato seeds ($3) produces 15-25 plants. At $4 each from a nursery, that’s $60-$100 of plants for the cost of a coffee.
I’ll tell you when I got hooked. Questo è particolarmente rilevante per seeds indoors. It was a Tuesday morning in February, grey and cold, and I was eating cereal at the kitchen table. I glanced at the seed tray on the windowsill — the one I’d planted six days earlier and mostly forgotten about — and there they were. Two tiny tomato seedlings, impossibly small, lifting their first leaves toward the pale winter light.
Something about that moment made me understand why people garden. Questo è particolarmente rilevante per seeds indoors. Not the harvest, not the savings, not the Instagram photos. It was watching a living thing emerge from a speck smaller than a pencil eraser, powered by nothing but soil, water, and sunlight. I had caused that to happen. Me, a person who had previously managed to kill a cactus.
That was four years ago. Questo è particolarmente rilevante per seeds indoors. Since then I’ve started thousands of seeds — some successfully, some catastrophically. I’ve grown leggy, pale, pathetic seedlings that flopped over like wet noodles. I’ve had entire trays wiped out by a fungal disease called damping-off that I didn’t even know existed. I once started my tomatoes so early that they were a foot tall and flowering before the last frost, which sounds great until you realize those plants were root-bound, stressed, and produced less fruit than the ones I started on time.
I’m telling you all of this because the gardening internet makes seed starting look effortless, and it’s not. Questo è particolarmente rilevante per seeds indoors. It’s simple — genuinely simple — but it rewards knowledge and punishes assumptions. The difference between beautiful seedlings and a tray of dead soil is usually one or two specific things that nobody mentions because they seem too obvious.
This guide is all the obvious stuff, stated plainly, plus everything I learned the hard way.
What’s Inside
- Why Start Seeds Indoors (And When Not To)
- Timing: When to Plant What
- Everything You Need (The Real List)
- Step-by-Step: Planting Your Seeds
- The Light Situation (This Is Where Most People Fail)
- Week-by-Week Seedling Care
- Troubleshooting: When Things Go Wrong
- Hardening Off: The Transition Nobody Talks About
- Seeds You Should NOT Start Indoors
- Frequently Asked Questions
· · · · ·
Why Start Seeds Indoors (And When Not To)
There are exactly three reasons to start seeds indoors, and they’re all practical:
Reason one: warm-season crops need a head start. Tomatoes, peppers, and eggplant need 60-90 days of warm weather to produce fruit. Questo è particolarmente rilevante per seeds indoors. In most of the US, that’s more warm days than the outdoor season provides. By starting these indoors 6-8 weeks before the last frost, you give them a running start so they’re already established when warm weather arrives. Without this head start, your tomatoes won’t produce until late summer — if they produce at all.
Reason two: variety. Your local garden center sells maybe 5-10 tomato varieties as seedlings. Questo è particolarmente rilevante per seeds indoors. Seed catalogs offer hundreds. Want a paste tomato bred in Italy, a cherry tomato that’s almost black, or a pepper variety your grandmother grew? Seeds are the only way. Starting your own unlocks the entire universe of plant varieties instead of whatever the nursery decided to stock this year.
Reason three: money. A six-pack of tomato seedlings from a nursery costs $4-$6. Questo è particolarmente rilevante per seeds indoors. A single seed packet ($2-$4) contains enough seeds for 15-25 plants. If you’re planting a decent-sized vegetable garden, starting from seed saves $50-$150 per season. Over a few years, the savings are significant.
Timing: When to Plant What
This is the section that prevents 80% of beginner problems. Questo è particolarmente rilevante per seeds indoors. Starting too early is the most common seed-starting mistake. It sounds counterintuitive — more time should mean bigger plants, right? But seedlings started too early outgrow their containers, become root-bound, get leggy from insufficient winter light, and actually perform worse after transplanting than seedlings started on time.
Everything revolves around your last frost date. This is the average date of the final spring frost in your area. Search “last frost date” plus your city to find yours. All seed-starting timing counts backward from this date.
| Crop | Start Indoors (Before Last Frost) | Transplant Outdoors | Notes |
|---|---|---|---|
| Onions / Leeks | 10-12 weeks before | 4-6 weeks before last frost | Slowest growers — start earliest |
| Peppers | 8-10 weeks before | 2 weeks after last frost | Need heat to germinate (80-85°F) |
| Eggplant | 8-10 weeks before | 2 weeks after last frost | Similar to peppers — warmth-lovers |
| Tomatoes | 6-8 weeks before | After last frost | Most popular indoor start crop |
| Broccoli / Cabbage / Kale | 6-8 weeks before | 2-4 weeks before last frost | Cold-tolerant — can go out earlier |
| Lettuce / Greens | 4-6 weeks before | 2-4 weeks before last frost | Fast growers — don’t start too early |
| Herbs (basil, parsley) | 6-8 weeks before | After last frost | Basil is frost-sensitive; parsley is cold-tolerant |
| Cucumbers / Squash | 3-4 weeks before | After last frost | Fast growers with sensitive roots — start in larger pots |
Everything You Need (The Real List)
The seed-starting industry wants to sell you heat mats, humidity domes, grow light rigs, self-watering trays, and specialty soil blends. You can buy all of that later if you want to. For your first season, here’s what actually matters:
Seeds
Buy from reputable sources. Check the “packed for” date — use within 2-3 years. Start with tomatoes, peppers, basil, and lettuce.
Cell Trays or Small Pots
Standard 72-cell trays are ideal. Or use egg cartons, yogurt cups, even newspaper pots. Must have drainage holes.
Seed Starting Mix
NOT potting soil. Seed starting mix is finer, sterile, and lighter. Critical for germination. This is not a place to cut corners.
Spray Bottle
For gentle watering that won’t displace tiny seeds. A watering can is too aggressive for seedlings. Misting is better.
Labels + Waterproof Marker
You will forget what you planted where. Guaranteed. Label everything. Popsicle sticks work fine.
Plastic Wrap or Humidity Dome
Covers trays during germination to hold moisture. Kitchen plastic wrap works perfectly. Remove once seeds sprout.
The “Nice to Have” List
Grow lights ($25-$60): If your windowsill doesn’t get 12-16 hours of bright light (most don’t), a basic LED grow light makes a dramatic difference. Position it 2-3 inches above seedlings. This is the single best upgrade you can make — it eliminates the leggy seedling problem entirely.
Heat mat ($15-$25): Warms soil from below, significantly speeding up germination for heat-loving seeds like peppers and eggplant. Not essential but genuinely helpful. Place it under trays during germination only, then remove once seeds sprout.
Larger pots for potting up ($5-$10): 3-4 inch pots for transplanting seedlings that outgrow their cells. You’ll need these about 3-4 weeks after planting when roots start appearing at drainage holes.
· · · · ·
Step-by-Step: Planting Your Seeds
Pre-moisten your seed starting mix
Pour the mix into a large bowl or bucket. Add warm water gradually, stirring with your hands, until the mix feels like a wrung-out sponge — damp throughout but not dripping. Peat-based mixes repel water when dry, so this pre-moistening step is essential. Skip it and you’ll have dry pockets in your trays that seeds can’t germinate in.
Fill your cells to the top
Pack the moistened mix gently into each cell, filling all the way to the rim. Tap the tray lightly on the table to settle the soil, then top off any cells that sank. Don’t compress the mix too firmly — roots need loose soil to grow through. Fill the edges and corners, not just the middles.
Make shallow depressions for seeds
Use the eraser end of a pencil, a chopstick, or the tip of your finger to make a small indentation in the center of each cell. Depth matters: check your seed packet. General rule: plant seeds at a depth of twice their diameter. Tiny seeds (lettuce, basil) barely get covered. Larger seeds (tomatoes, peppers) go about ¼ inch deep.
Place seeds and cover lightly
Drop 1-2 seeds per cell. If your germination rate is uncertain, plant 2 per cell and thin to the strongest one later. Gently press seeds into the soil, then sprinkle a thin layer of mix over them. Some tiny seeds (like lettuce) need light to germinate — just press them onto the surface without covering.
Cover, label, and wait
Drape plastic wrap over the tray (or use a humidity dome) to hold moisture. Place in a warm spot — on top of the fridge, near a heating vent, or on a heat mat. Label every single cell. Then: patience. Most seeds take 5-14 days to germinate. Check daily for moisture (mist if the surface looks dry) and for the first green sprouts breaking through.
The Light Situation (This Is Where Most People Fail)
I’m giving light its own section because it’s the number one reason indoor seedlings fail, and it’s the thing that every beginner underestimates.
Here’s the reality: a sunny windowsill is usually not enough light for seedlings. I know that contradicts what most beginner guides say. But think about it — a south-facing window in February or March provides maybe 4-6 hours of direct light, filtered through glass that blocks some UV. Seedlings need 12-16 hours of strong light per day. The math doesn’t work.
Seedlings that don’t get enough light grow tall, thin, and pale. They stretch toward the light source, developing weak stems that can’t support their own weight. They flop over. They never recover their sturdiness. This is called “legginess” and it’s the most common indoor seed-starting problem by far.
The Windowsill Approach (Budget)
If you’re committed to windowsill-only growing, use a south-facing window and rotate trays daily so plants don’t lean. Place a sheet of aluminum foil behind the trays to reflect light back onto the seedlings. Accept that some legginess is inevitable. This approach works for tough, forgiving crops like tomatoes and herbs. It struggles with peppers and eggplant.
The Grow Light Approach (Recommended)
A $25-$40 LED grow light on a simple timer changes everything. Position it 2-3 inches above the seedling tops (raise it as they grow). Set the timer for 14-16 hours per day. Your seedlings will be short, stocky, dark green, and strong — the complete opposite of windowsill-only seedlings.
The critical detail: 2-3 inches above the plants. Not 12 inches. Not 24 inches. Right above them. The inverse square law means that doubling the distance reduces light intensity by 75%. If your light is too far away, it’s barely better than a window.
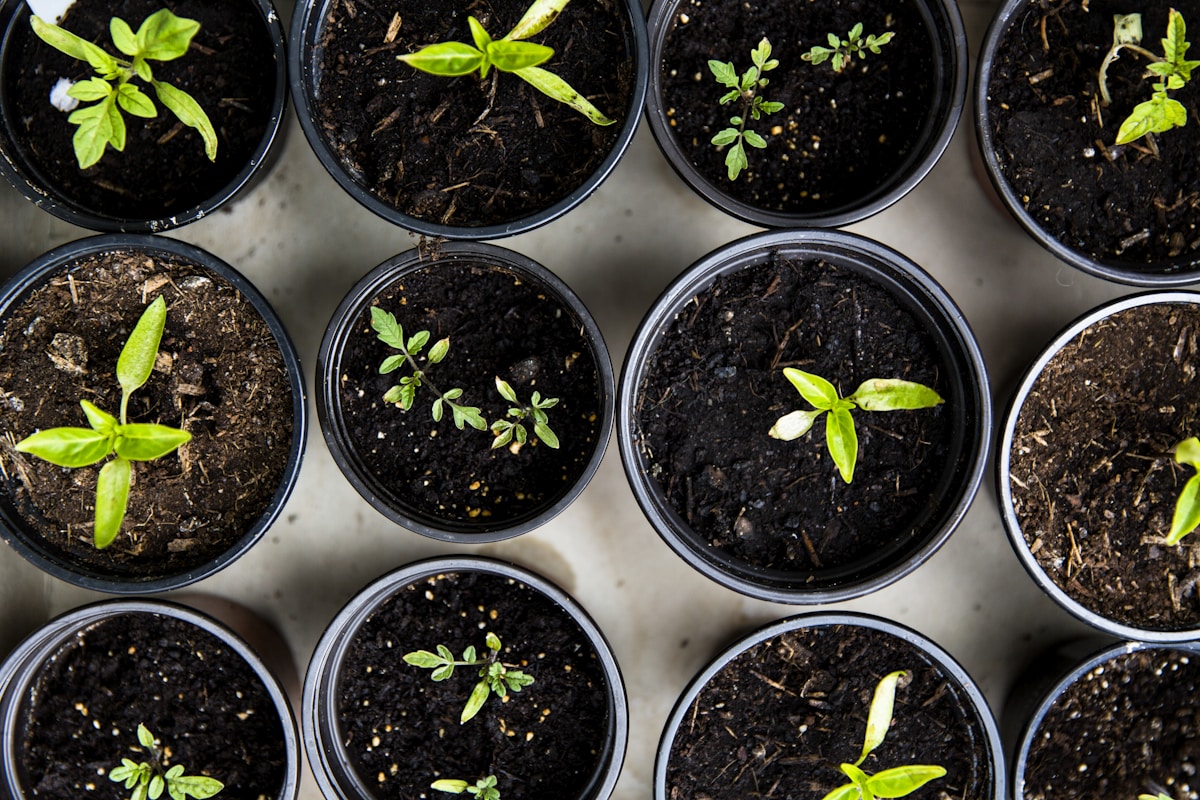
Week-by-Week Seedling Care
Once your seeds sprout, the real caregiving begins. Here’s what to do each week:
Week 1: Germination
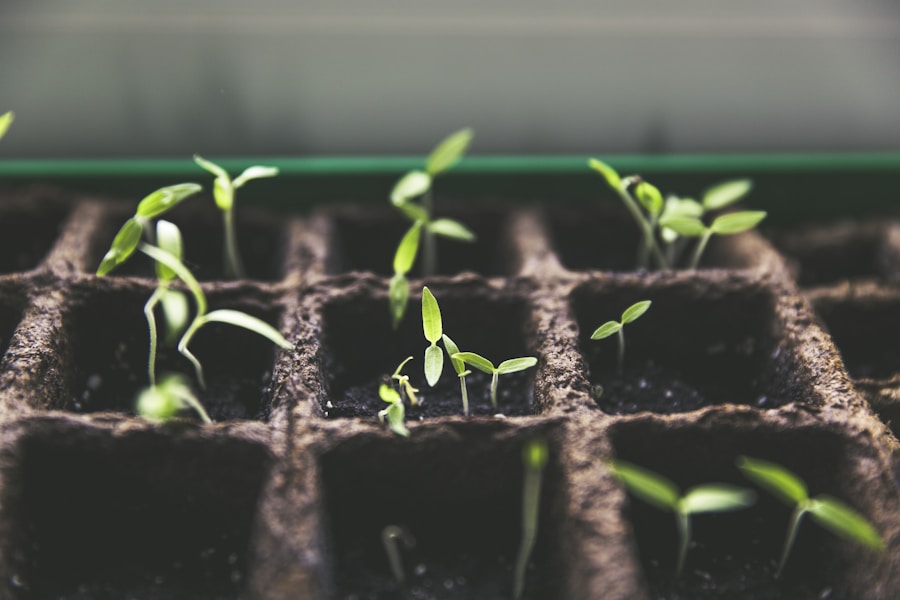
Seeds are under plastic in a warm spot. Check moisture daily — mist if surface is dry. Watch for the first green loops breaking through. Once they appear, remove the cover immediately and move to your brightest light. Keep soil consistently moist but not waterlogged.
Week 2: First Leaves (Cotyledons)
Seedlings show their first set of leaves — these are seed leaves, not true leaves. Keep light 2-3 inches above. Water from the bottom by pouring water into the drip tray and letting cells absorb it upward. This encourages roots to grow down. Thin to one seedling per cell if you planted multiples — snip the weaker one with scissors (don’t pull, it disturbs roots).
Weeks 3-4: True Leaves Emerge
The second set of leaves — these are the first “real” leaves and look different from the cotyledons. This is when seedlings start growing noticeably. Begin feeding: dilute liquid organic fertilizer to one-quarter strength, once per week. If roots poke out of drainage holes, it’s time to pot up into 3-4 inch containers.
Weeks 5-6: Growth Phase
Seedlings are growing rapidly now. Continue feeding weekly at half-strength. Run a fan on low near the seedlings for 1-2 hours daily — the gentle air movement strengthens stems (simulating outdoor wind). Keep light close. If stems are still stretching, light is too far away or on for too few hours.
Weeks 7-8: Pre-Transplant
Begin hardening off (see next section). Reduce watering slightly — let the soil surface dry between waterings to toughen plants. Stop fertilizing 1 week before transplanting outdoors. Plants should be 4-8 inches tall with strong stems and multiple sets of true leaves.
Troubleshooting: When Things Go Wrong
| Problem | What You See | Cause | Fix |
|---|---|---|---|
| Leggy seedlings | Tall, thin stems; pale color; leaning | Not enough light | Move light closer (2-3″); add hours; reflective material behind trays |
| Damping-off | Seedlings collapse at soil line; stem pinched | Fungal disease from overwatering + poor airflow | Let soil dry between waterings; improve air circulation; use sterile mix |
| Seeds don’t germinate | Nothing after 14+ days | Old seed, wrong temperature, too deep, or too dry | Check seed viability; use heat mat; review planting depth; maintain moisture |
| Yellowing leaves | Lower leaves turn yellow | Nutrient deficiency (nitrogen) | Begin feeding with dilute liquid fertilizer; pot up if root-bound |
| White mold on soil | Fuzzy white growth on surface | Too much moisture, poor airflow | Scrape off mold; improve ventilation; reduce watering; usually harmless |
| Purple/red leaves | Undersides of leaves turn purple | Phosphorus deficiency (often from cold soil) | Warm the soil; begin feeding; check room temperature (keep above 60°F) |
| Root-bound plants | Roots circle bottom or poke out holes | Container too small; too long in cells | Pot up immediately to 3-4″ containers with fresh mix |
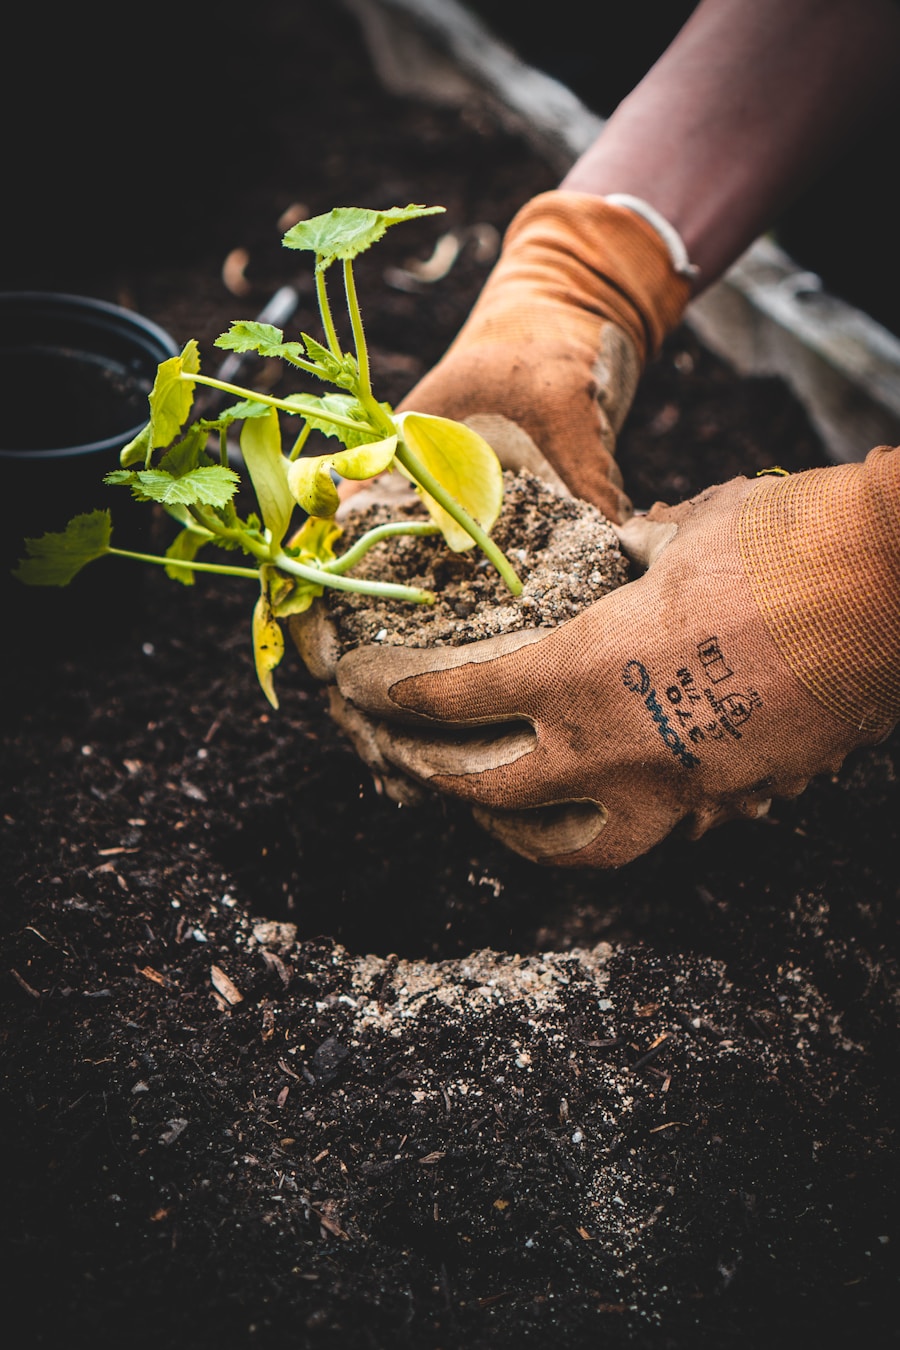
Hardening Off: The Transition Nobody Talks About
This is the step that trips up experienced gardeners, not just beginners. Your seedlings have lived their entire lives in a climate-controlled environment — consistent temperature, no wind, no direct UV. Moving them directly from indoor comfort to outdoor reality will shock and possibly kill them. The leaves scorch. The stems snap in wind. The temperature fluctuations overwhelm them.
Hardening off is the gradual process of acclimatizing indoor seedlings to outdoor conditions. It takes about two weeks and it’s not optional.
Days 1-3: Place seedlings outside in a sheltered, shaded spot for 2-3 hours during the warmest part of the afternoon. Bring them back inside before evening.
Days 4-7: Increase outdoor time to 4-6 hours. Introduce brief periods of direct morning sun (which is gentler than afternoon sun). Continue bringing them in at night.
Days 8-10: Leave them out all day in increasing sun. Bring in at night only if frost threatens.
Days 11-14: Leave them out overnight if temperatures stay above 50°F (10°C) for warm-season crops. By day 14, they should be fully acclimated and ready for transplanting into your garden beds or containers.
Seeds You Should NOT Start Indoors
Not everything benefits from an indoor start. Some plants genuinely prefer to be sown directly where they’ll grow. Starting these indoors is a waste of time at best and counterproductive at worst:
Root vegetables (carrots, radishes, turnips, parsnips, beets): Their taproots don’t transplant well. Disturbing the root causes forking, stunting, or outright failure. Direct sow these into your garden beds or containers once soil is workable.
Beans and peas: These grow so fast from direct sowing (7-10 days to sprout) that the indoor head start is minimal. They also have sensitive roots that resent transplanting. Plant them directly outdoors after the last frost.
Corn: Needs to be planted in blocks for pollination and grows far too large for indoor containers. Direct sow into warm garden soil.
Dill and cilantro: Both have taproots and bolt (go to seed) quickly when stressed — which transplanting almost always causes. Direct sow these herbs where you want them.
· · · · ·
Frequently Asked Questions
Do I really need a grow light, or will a window work?
A south-facing window can work for tough crops like tomatoes and herbs, but results will be noticeably better with a grow light. Windowsill seedlings almost always develop some legginess because winter windows provide 4-6 hours of filtered light — far less than the 12-16 hours seedlings want. A basic LED grow light ($25-$40) positioned 2-3 inches above seedlings on a timer eliminates this problem entirely. If you start more than a tray or two, or if you grow peppers or eggplant, a grow light is worth every penny.
Why did my seedlings get tall and floppy?
Insufficient light — this is the cause in at least 90% of cases. Seedlings stretch toward the nearest light source, growing tall and thin at the expense of stem strength. The fix: more light, closer light, or longer light duration. If using a grow light, it should be 2-3 inches from the tops of the seedlings, not 12 inches. Also ensure 14-16 hours per day. Running a small fan near seedlings for gentle air movement also strengthens stems.
What is damping-off and how do I prevent it?
Damping-off is a fungal disease that kills seedlings at the soil line — you’ll see them suddenly topple over with a pinched, water-soaked stem at ground level. It thrives in overly wet, stagnant conditions. Prevent it by using sterile seed-starting mix (not garden soil), letting the soil surface dry slightly between waterings, providing good air circulation (a gentle fan), and not overcrowding seedlings. Once a seedling has damped off, it cannot be saved — but the neighbors can be protected by improving conditions immediately.
Can I use regular potting soil for starting seeds?
Regular potting soil is too coarse and nutrient-rich for seed starting. It can smother tiny seeds, drain poorly in small cells, and the high nutrient levels can actually burn young seedlings. Seed-starting mix is specifically formulated to be fine-textured, sterile, and moisture-retentive while staying light. It costs a few dollars more but the germination rate difference is dramatic. This is one area where the specialized product genuinely matters.
How do I know when seedlings are ready to transplant outdoors?
Seedlings are transplant-ready when they have 3-4 sets of true leaves (not counting the initial seed leaves), strong stems that don’t flop, and have been properly hardened off for 10-14 days. For warm-season crops (tomatoes, peppers, eggplant), the soil temperature should be at least 60°F and nighttime air temperatures consistently above 50°F. For cool-season crops (broccoli, kale, lettuce), they can go out earlier since they tolerate light frost.
Is seed starting actually worth the effort compared to buying seedlings?
If you’re planting 5 or fewer plants, buying nursery seedlings is simpler and the cost difference is small. But if you’re planting a real garden — say, 10-20+ plants of various types — starting from seed saves $50-$150 per season, gives you access to hundreds of varieties unavailable as nursery starts, and produces seedlings that are often healthier because you controlled their environment from day one. The effort is real but modest: about 15 minutes to plant, plus 5 minutes per day of care for 6-8 weeks. For many gardeners, the process itself is deeply satisfying — there’s genuine joy in watching a speck of seed become a food-producing plant.
Per approfondire: Seeds Indoors – Wikipedia